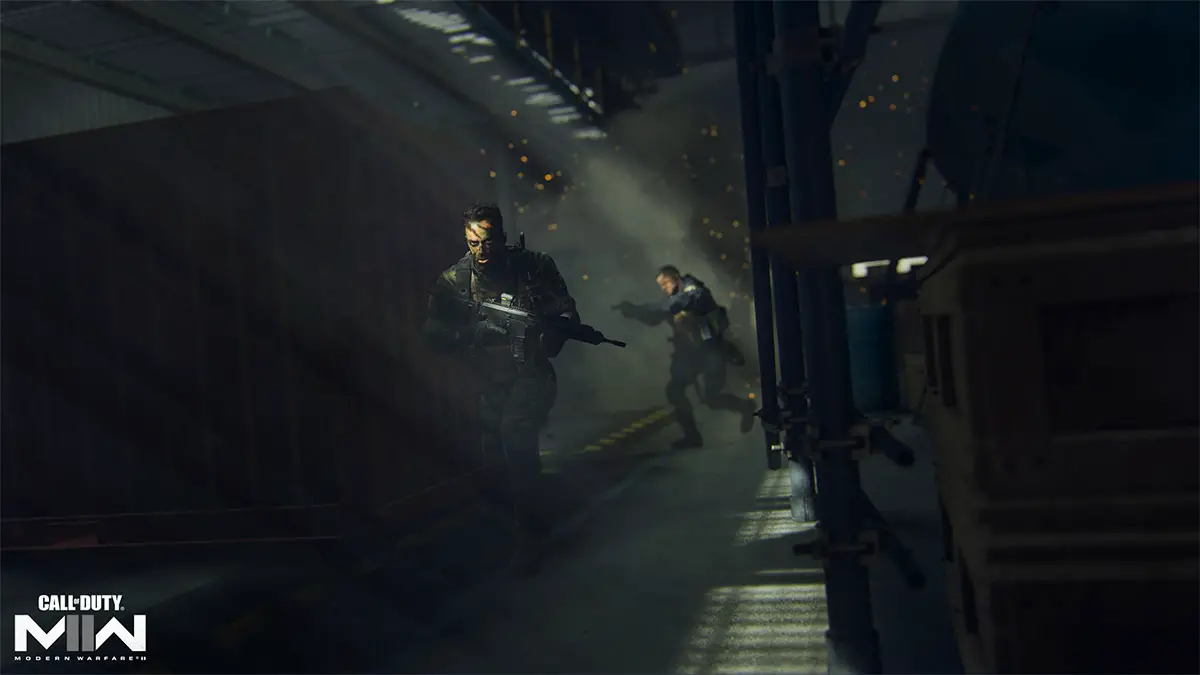
La misión final de la facción Black Mous de nivel 5 es una de las misiones más complejas y que requieren más tiempo en Call of Duty: Warzone DMZ. Crack The Code te pide que adquieras el taladro especial con punta de diamante y lo uses para abrir Factory Safe. En esta guía, he mostrado en detalle cómo puedes completar esta misión de forma rápida y sencilla.
Descifrar el código Black Mous Mission DMZ Tutorial
A continuación se muestran todos los objetivos de Crack The Code:
- Perfora la caja fuerte en Factory Wing usando el taladro con punta de diamante que se encuentra en la habitación cerrada con teclado en Alpha Cluster.
- Extrae la nota que se encuentra en el interior.
Tabla de contenidos ocultar Elementos necesarios para esta misión. Dónde encontrar el detector R4D y la clave de administrador de fábrica Dónde encontrar el Alpha Cluster y cómo desbloquearlo Cómo sacar el taladro con punta de diamante de la habitación cerrada con teclado Dónde encontrar la caja fuerte en Factory Wing Cómo perforar la caja fuerte en Factory Wing
Elementos necesarios para esta misión.
Antes de comenzar, quiero informarte sobre algunos elementos que te recomiendo que lleves contigo para descifrar el código:
- Equipo de primer nivel : incluye poderosas armas personalizadas, un chaleco de nivel tres y un kit de autorrevivencia. Recomiendo traer la escopeta KV Broadside como una de tus armas.
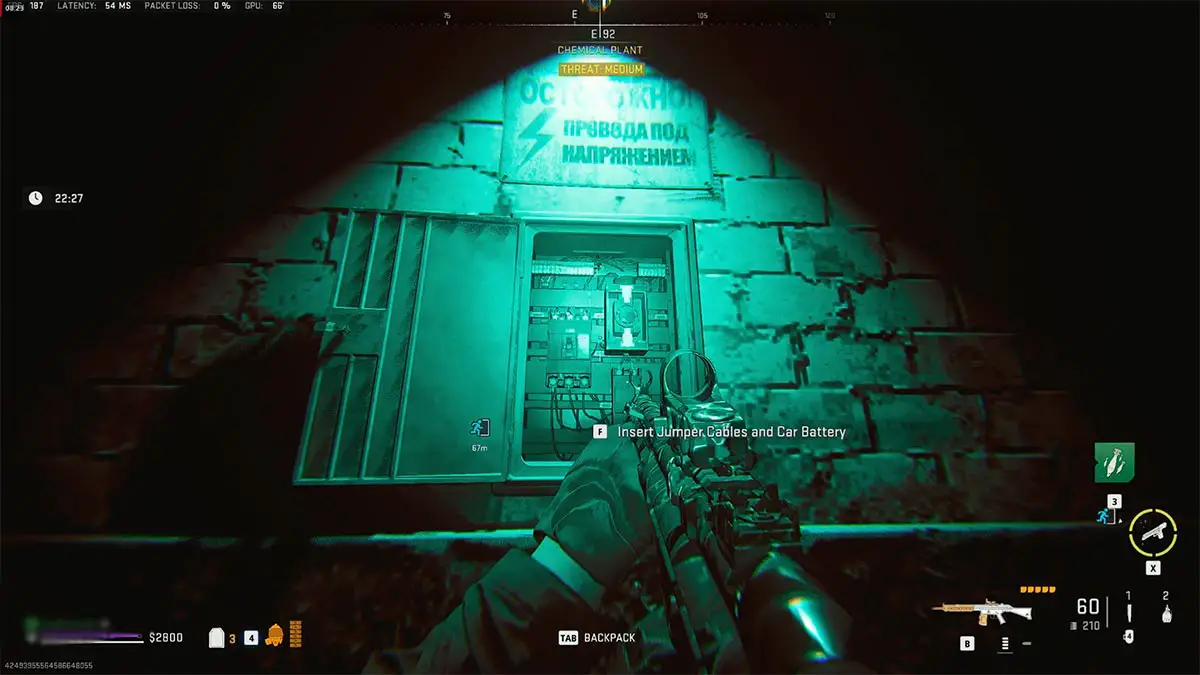
- Batería de automóvil y cables de puente : asegúrese de adquirir estos dos elementos en Al Mazrah, ya que los necesitará para desbloquear el Alpha Cluster.
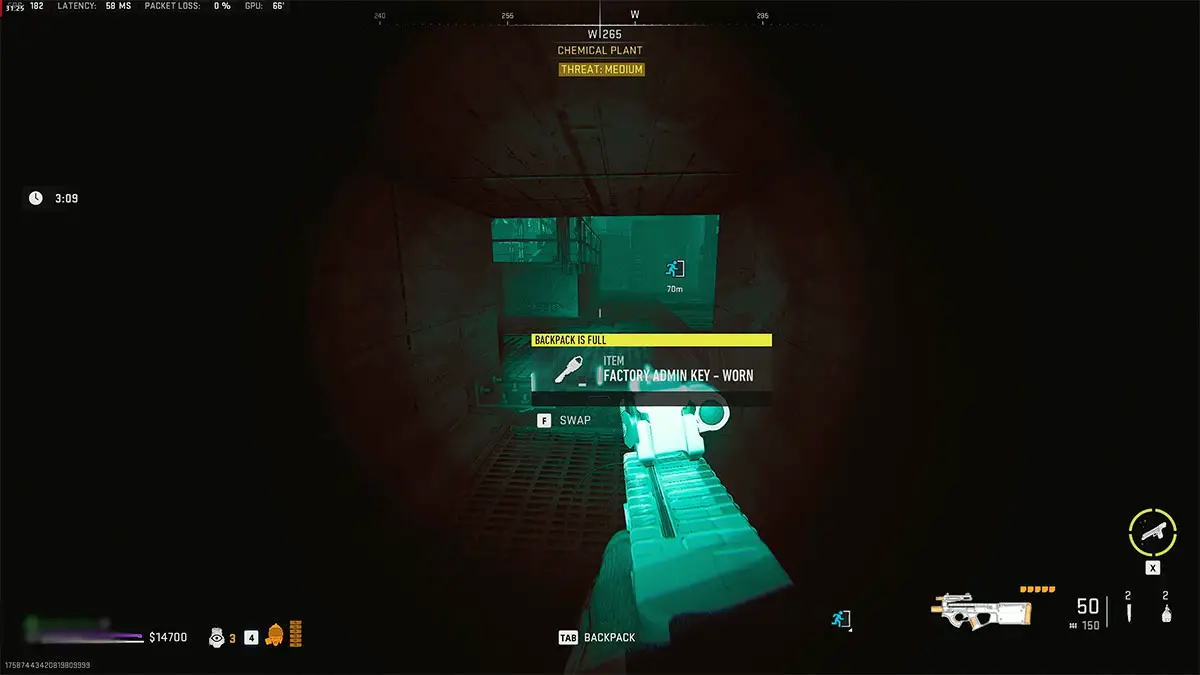
- Clave de administrador de fábrica : si aún no tiene esta clave, puede encontrar una dentro de los respiraderos en la sección Planta química del Complejo Koschei.
- Bomb Drone Killstreak : No es necesario, pero el Bomb Drone te permitirá matar al rinoceronte y al francotirador de un solo golpe. Tome dos de estos si es posible.
Ahora, despliegue en Al Mazrah y luego viaje al Complejo Koschei por la entrada que elija. Dirígete a la sección Planta química y equipa tus gafas de visión nocturna para tener una visión clara.
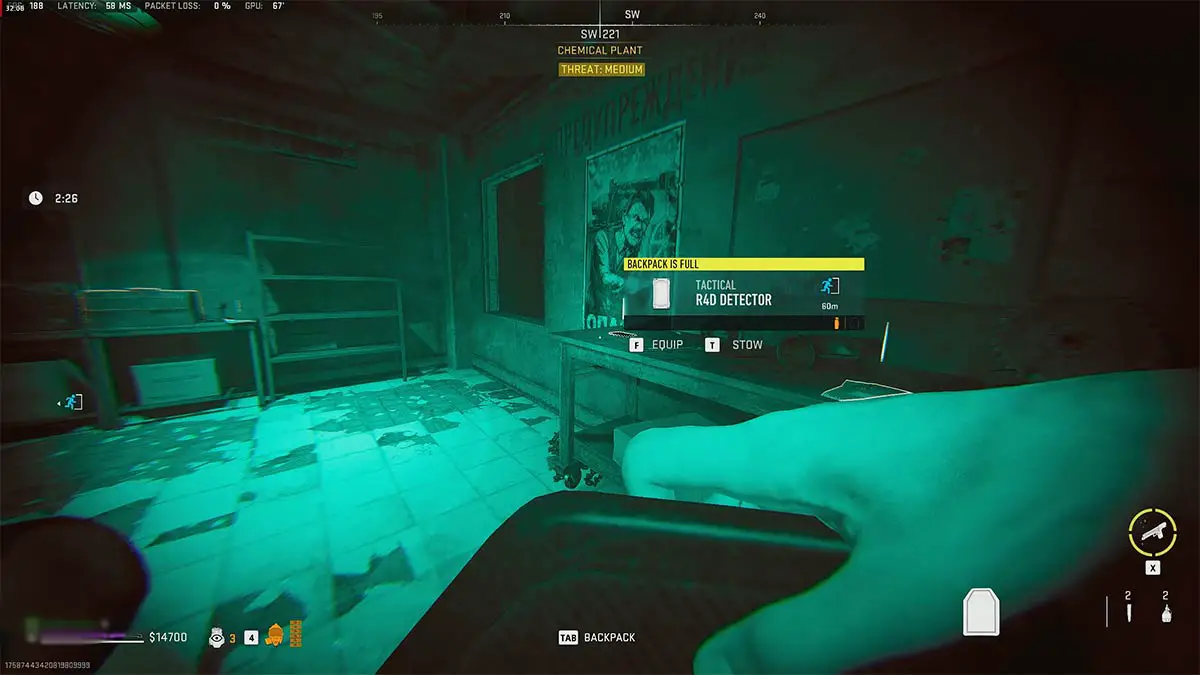
Dónde encontrar el detector R4D y la clave de administrador de fábrica

Captura de pantalla de guías de juegos profesionales
Captura de pantalla de guías de juegos profesionales
Para resolver el rompecabezas de la habitación cerrada con teclado dentro de Alpha Cluster, necesitarás el equipo táctico R4D Detector. Este dispositivo se puede encontrar dentro de las dos pequeñas salas de oficinas en la sección de Planta Química . Además, consiga la clave de administrador de fábrica que debería estar en algún lugar de las rejillas de ventilación cercanas .
Relacionado : Salir a través de la guía de la misión Sector Alpha DMZ
Dónde encontrar el Alpha Cluster y cómo desbloquearlo
Captura de pantalla de guías de juegos profesionales
Captura de pantalla de guías de juegos profesionales
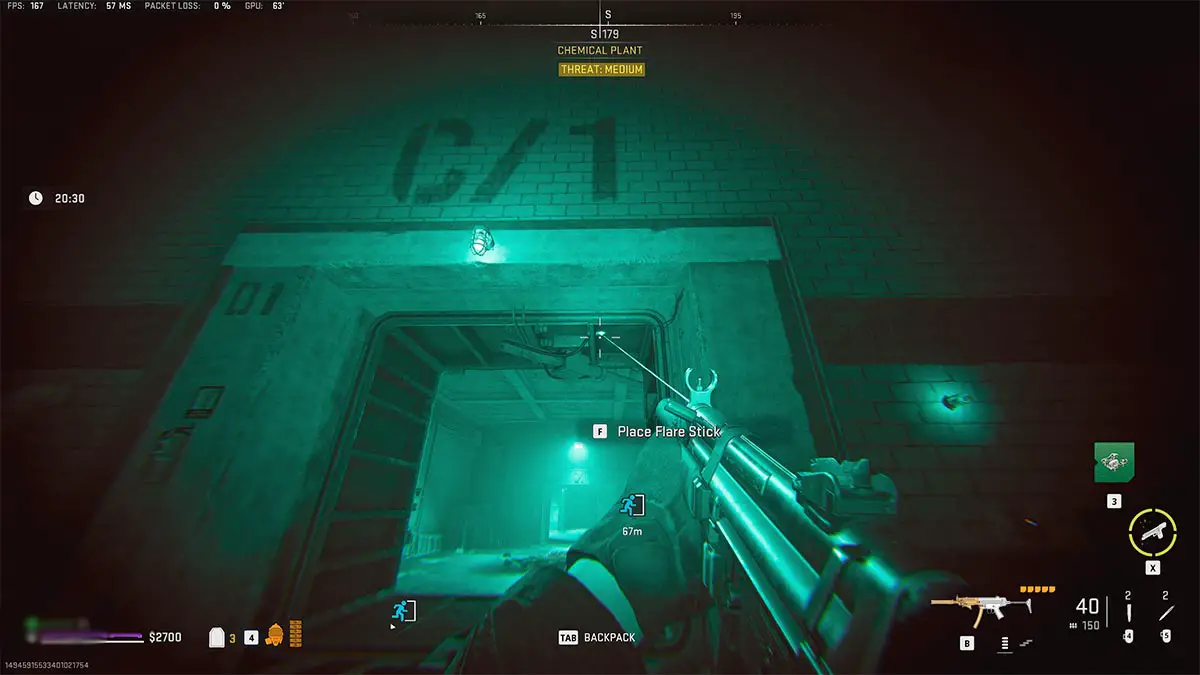
Una vez que tenga los elementos necesarios, diríjase en dirección sur hasta llegar a Bunker Door C/1 o C/2 . Entre estas puertas, encontrará un panel de interruptores donde deberá colocar la batería del automóvil y los cables de puente que trajo consigo. Esto encenderá las puertas del búnker, que luego podrás desbloquear para acceder al Alpha Cluster.
Cómo sacar el taladro con punta de diamante de la habitación cerrada con teclado
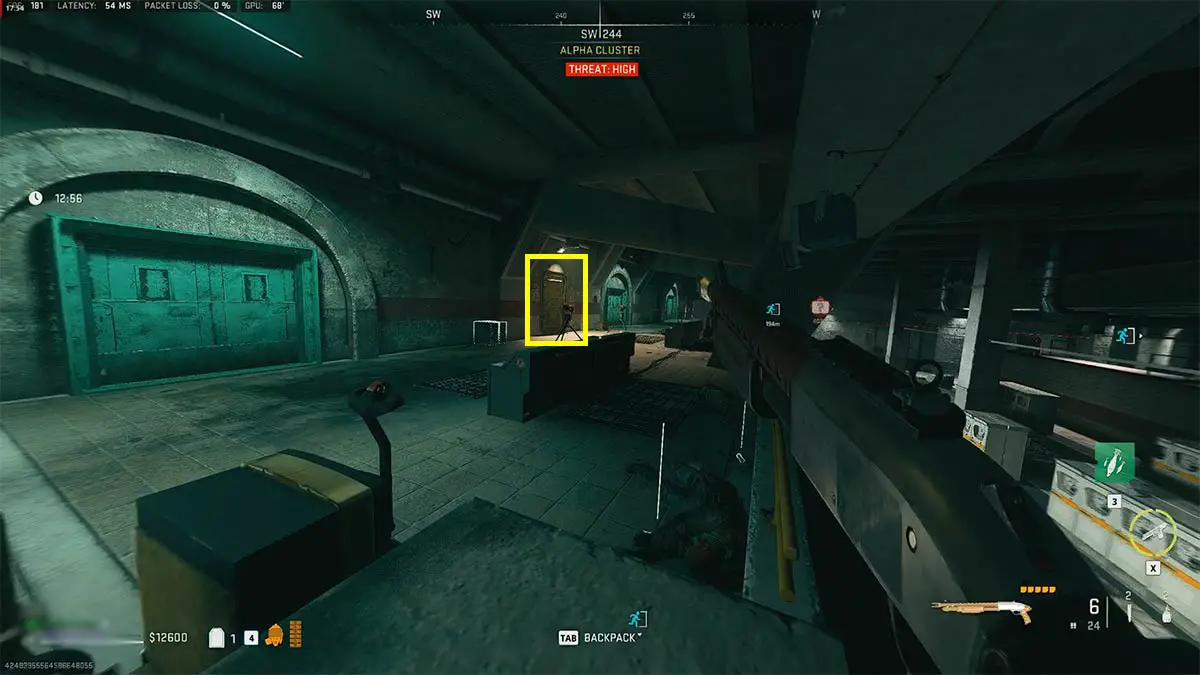
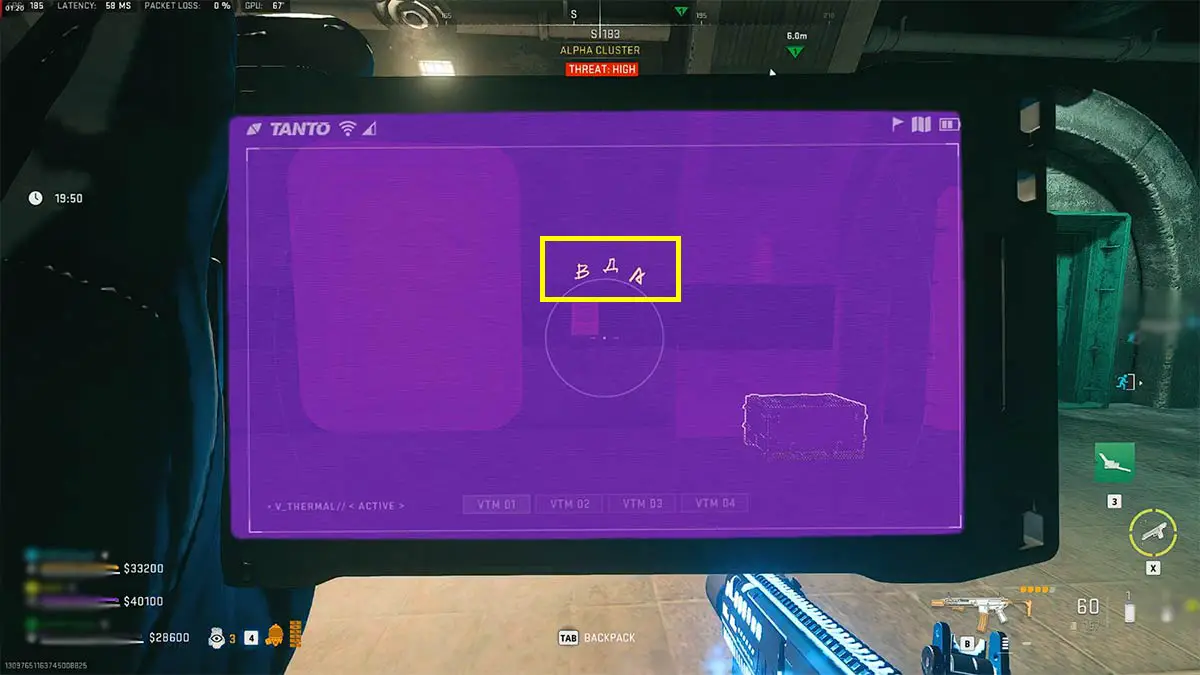
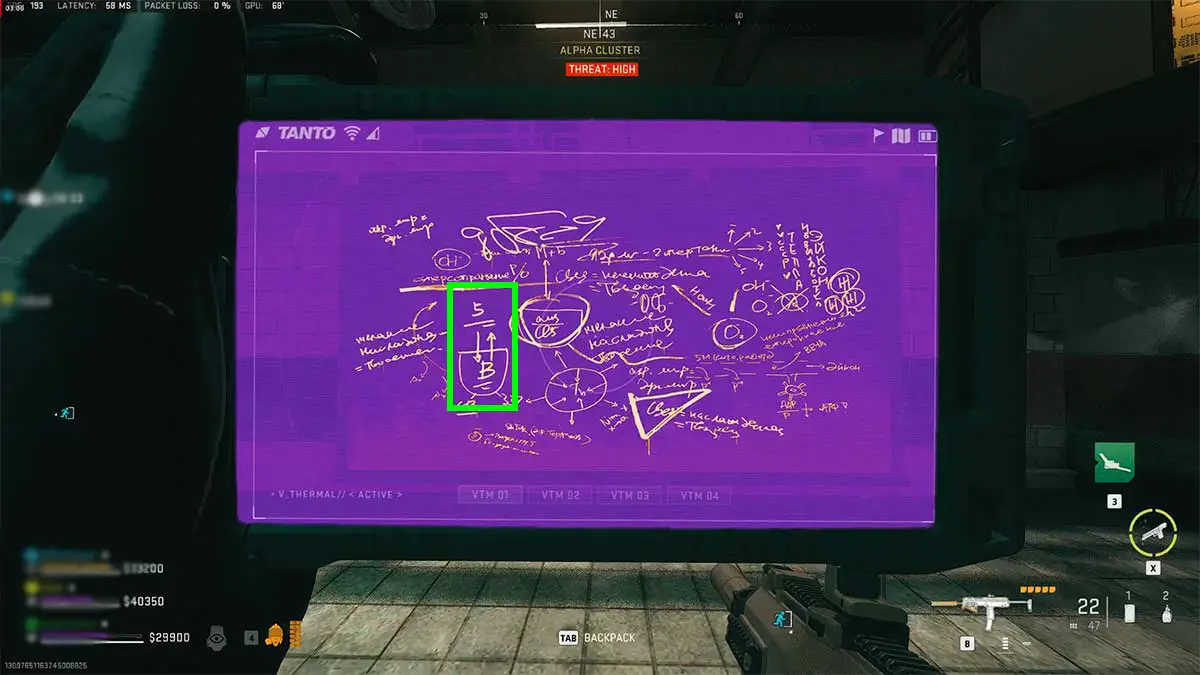
Make your way inside the Alpha Cluster, and at the west end of the sector, you’ll find two sentry turrets guarding an area. Take out the guards and the turrets and approach the keypad-locked room, as shown in the first image. Scan the keypad next to the door with your R4D Detector, and you’ll see three symbols. To decipher these symbols, look for chalkboards around the Alpha Cluster and scan them using the R4D Detector.
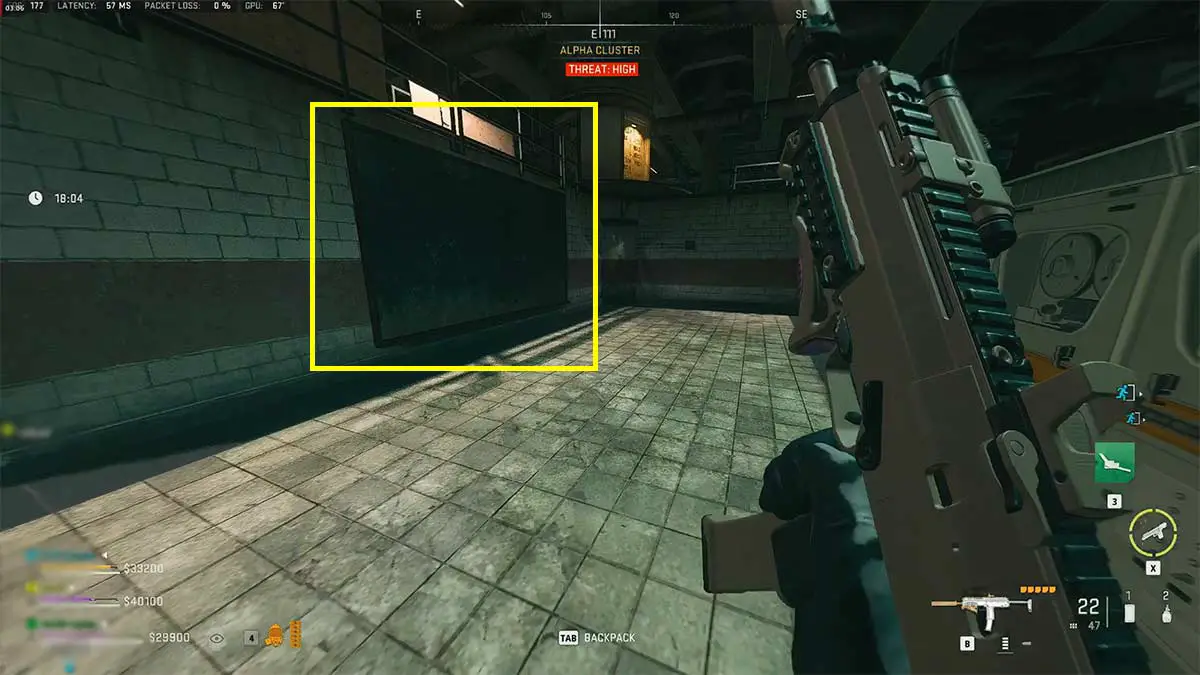
Each chalkboard has a symbol, and it may or may not be the one you need to decipher. If you find a chalkboard with one of the symbols you need to decode, note the number associated with it. In my case, the digit for the first symbol B was 5 as you can see in the last picture. Also, beware of the laser traps and guards while exploring the area.
Screenshot by Pro Game Guides
Screenshot by Pro Game Guides
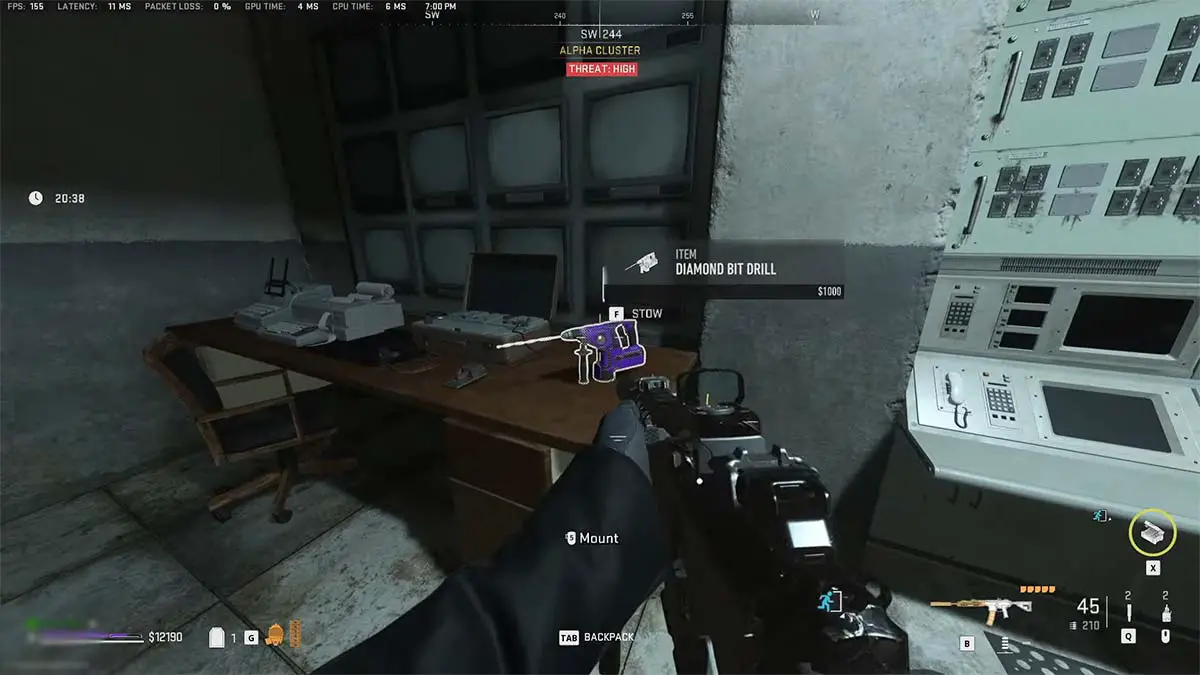
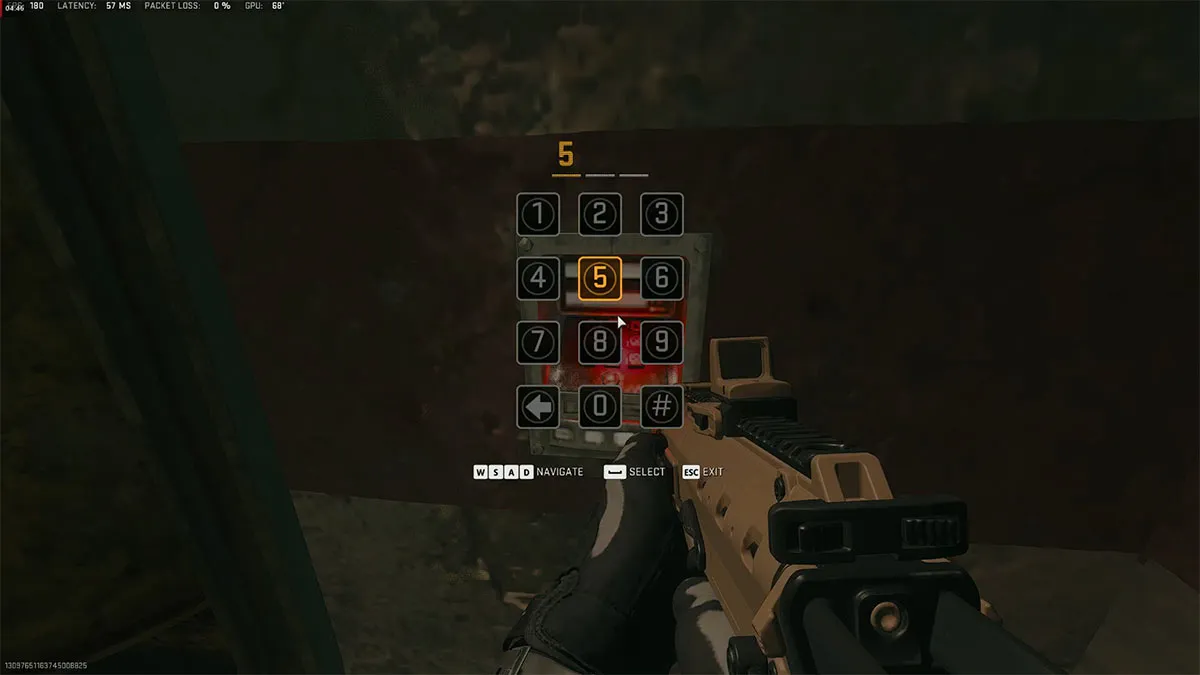
Once you have decoded at least two of the symbols, go back to the keypad-locked room and try to unlock the door by guessing the third digit that you don’t know. For instance, I knew the first two digits were 5 and 7, so I started using numbers from 0 to 9 for the third code until I finally unlocked the door. Now, pick up the Diamond Bit Drill from the table and head back out of the Alpha Cluster. You can also take the Heated Madness blueprint part from the room.
Related: DMZ Breaking the Bunker mission guide
Where to find the safe in the Factory Wing
In the north end of the Chemical Plant, you’ll find Bunker Doors A/1 and A/2. Enter either one of these airlocks and use the Factory Admin Key to unlock the yellow door. This will lead you to the Factory Admin section, where you can access the Shopkeeper buy stations. I highly suggest you fill up your backpack with munition boxes and armor plates, as you’ll need them soon.
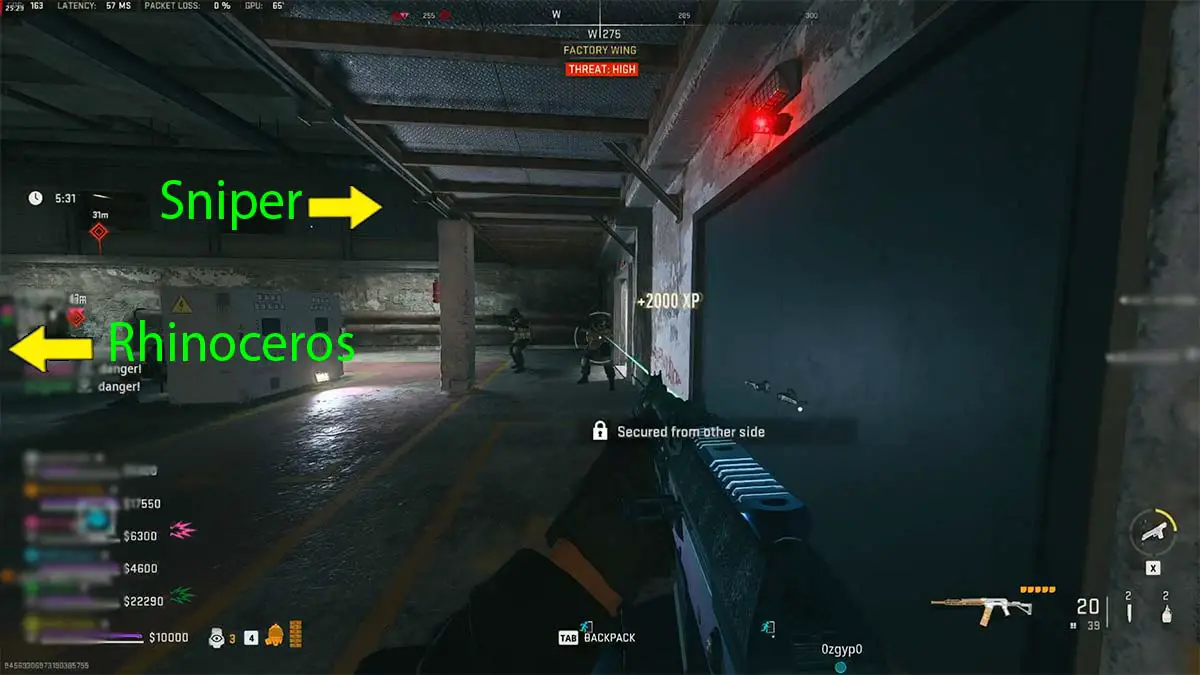
Proceed further inside the area while fighting off bots, and you’ll eventually reach the Factory Wing. This is the section where the Rhinoceros and the Sniper are held up. While the Rhino will be on the same level as you, the Sniper resides one floor above that you can access only via the door you can see in the image above.
Now, you can take out the Rhino in one magazine of the KV Broadside Shotgun if you have the 25 Round Drum mag and Dragon’s Breath attachments on it. Make sure to shoot him up close and be prepared to take some damage.
Alternatively, the easiest way to take the boss out is by using the Bomb Drone killstreak. Sit in a safe spot away from the bots and fly the Bomb Drone close to the Rhino before detonating it. Similarly, use the second Bomb Drone, if you have it, to kill the Sniper hiding on the top floor.
Screenshot by Pro Game Guides

Screenshot by Pro Game Guides
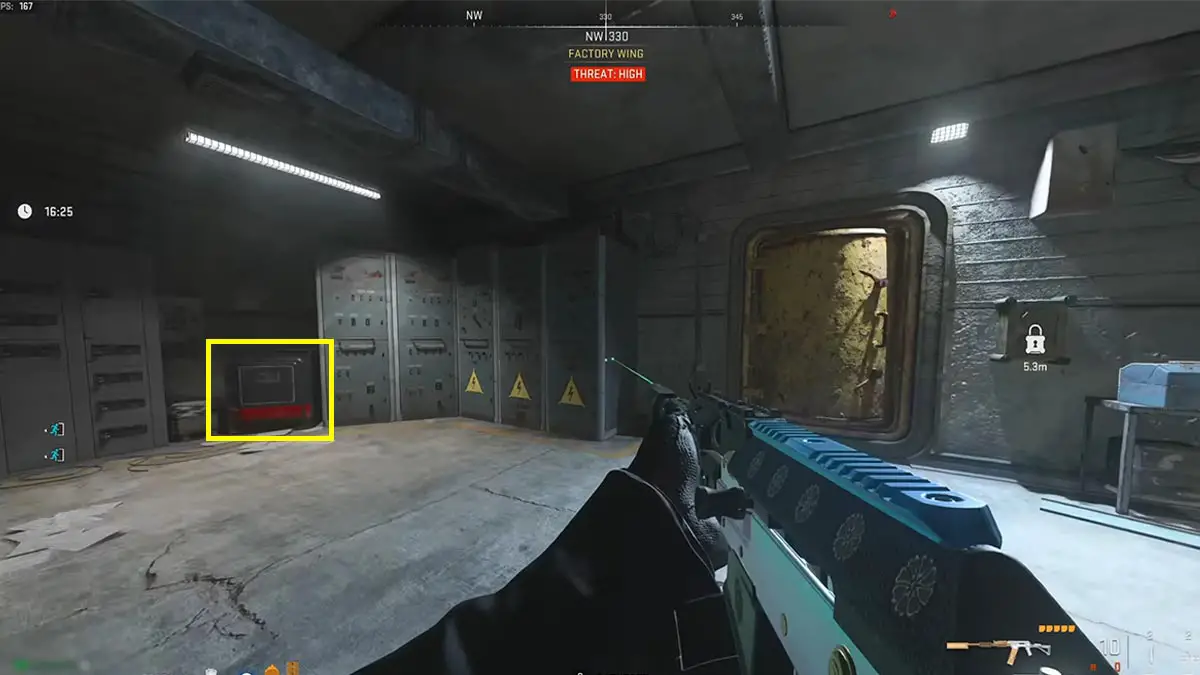
Once the Rhino is down, take the stairs up and carefully dodge and disable the laser traps. Now, kill the Sniper if you don’t have the second Bomb Drone. Once the Sniper is down, he’ll drop a Secure Room Key. Grab this key, and the Secure Room will be marked for you. But for this mission, you don’t even have to unlock that door as the factory safe sits in the corner outside the room (see image).
How to drill the safe in the Factory Wing
The next part is simple, just approach the safe and press the interact button to start drilling. Remember, this is only possible while you’re carrying the diamond-tipped drill from the Alpha Cluster. Wait until the drilling process is over for the safe to open. Inside the safe, you’ll find three types of vests, Dr. M’s Lab Notebook and Bunker Safe Note.
I stowed both the notebook and safe note into my backpack just in case. Once you’ve picked up the two items, all you have to do is exfil from Koschei Complex to complete the Crack The Code mission. I suggest using the L2 Restricted Zone inside Factory Wing to extract as it’ll be safer than the Chemical Plant exfil elevator.
Estén atentos a las guías de juegos profesionales para obtener más contenido de Call of Duty: Modern Warfare 2 y Warzone 2. Mientras tanto, dirígete a nuestro artículo sobre la Guía de la misión DMZ para la obtención de explosivos .